家裡的舊電腦裡的 Windows 掛掉了,需要重灌,但舊電腦只有用來上網,所以我決定安裝Ubuntu,希望舊電腦的開機的速度/執行效率會比較快一點。
安裝影像檔(.ISO),台灣的下載點:http://tw.archive.ubuntu.com/ubuntu-cd/
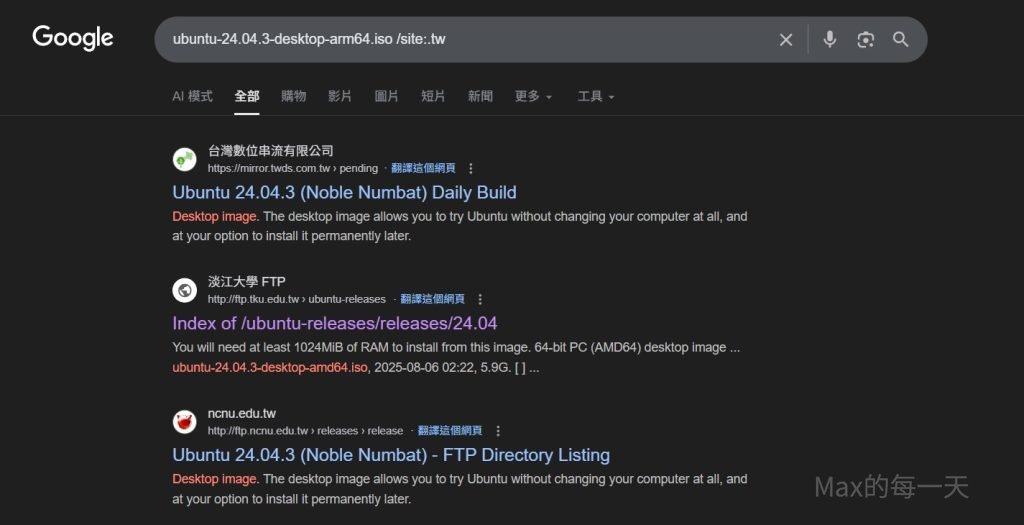
其他台灣的下載點可以使用 google 來查詢:
ubuntu-24.04.3-desktop-arm64.iso /site:.tw上面的版本號碼, 請修改成ubuntu 上官方網站 desktop 版本最後的下載版本。
下載失敗的問題
由於 iso 檔案都太大, 如你的的網路常下載失敗, 建議使用支援續傳的用戶端來下載檔案. 如果找的到 ftp 的載點的話, 也可以使用 FileZille 來下載.
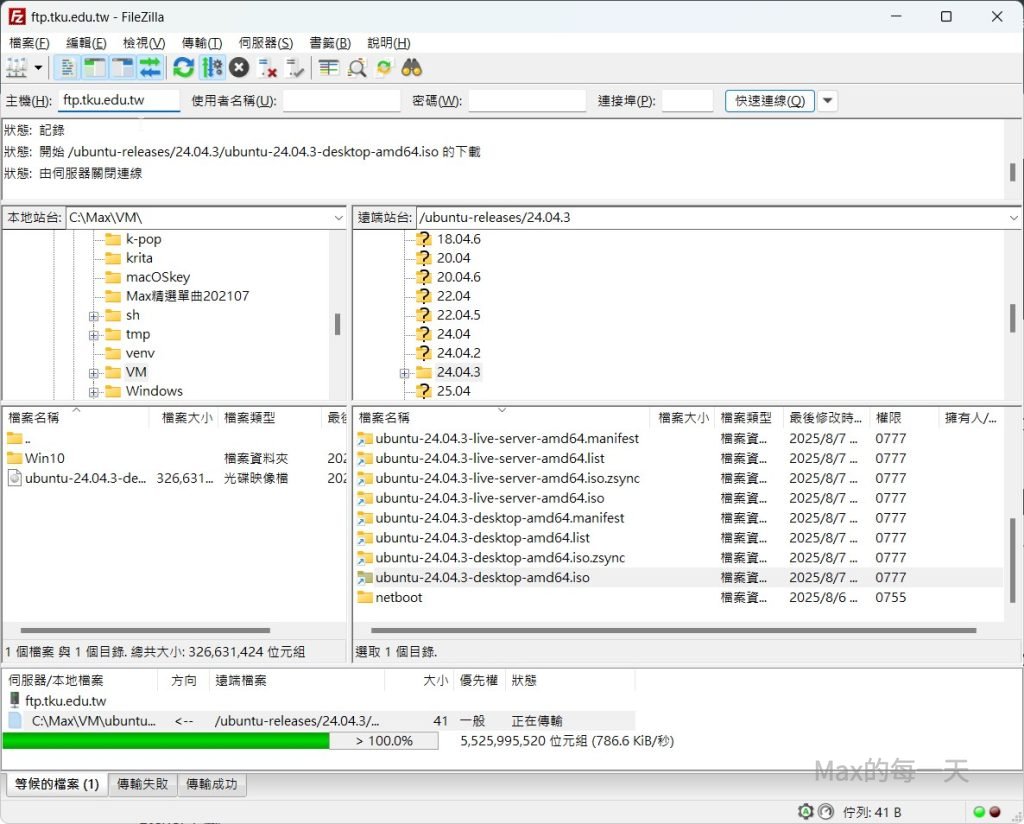
在 google 有查到 ftp.tku.edu.tw 可以下載, 所以直接在 filezilla 裡輸入 ftp.tku.edu.tw 就看到下載點了.
下載好後,就是要找一個 USB來做成開機USB,就可以安裝Ubuntu了。
由於家裡一台Windows電腦都沒有,所以只能透過新買的Mac OS 來做開機片。
透過Windows 平台來做USB開機光碟:
目前 ubuntu 建議的工具是 balenaEtcher:
https://etcher.balena.io/
For most users we recommend balenaEtcher instead of Rufus which is simpler to use and also available on MacOS and Ubuntu. Instructions are now included in the primary Install Ubuntu Desktop tutorial.
How to create a bootable USB stick on Windows
(用Windows做USB開機片的教學文章)
https://ubuntu.com/tutorials/create-a-usb-stick-on-windows#1-overview
How to create a bootable USB stick on OS X
(用 Mac OS X 做USB開機片的教學文章)
https://tutorials.ubuntu.com/tutorial/tutorial-create-a-usb-stick-on-macos#0
說明:以前 Mac OS X 只有手動的指令來安裝,現在居然也有友善的視窗介面的工具。
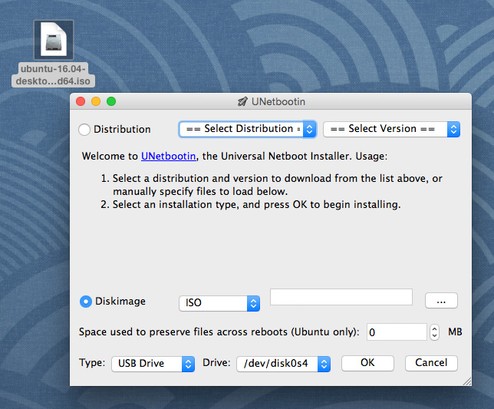
但我試了這個工具3次,都失敗,會寫有缺 linux什麼.bin 檔案,所以不給我安裝,解法是要透過指令來做開機片:
How to install Ubuntu on MacBook using USB Stick
https://help.ubuntu.com/community/How%20to%20install%20Ubuntu%20on%20MacBook%20using%20USB%20Stick
下面英文很多,可以不用看,照黑體字的部份執行一次,USB 就可以開機了。
網路下載的是 .iso 格式,我們先服用下面的指令,把 .ios 轉成 .img 格式。
Manual Approach
We would encourage Mac users to download Ubuntu Desktop Edition by burning a CD for the time being. But if you would prefer to use a USB, please follow the instructions below.
Note: this procedure requires an .img file that you will be required to create from the .iso file you download.
TIP: Drag and Drop a file from Finder to Terminal to ‘paste’ the full path without typing and risking type errors.
- Download the desired file
- Open the Terminal (in /Applications/Utilities/ or query Terminal in Spotlight)
- Convert the .iso file to .img using the convert option of hdiutil hdiutil convert /path/to/ubuntu.iso -format UDRW -o /path/to/target.img 如果你是下載到 ~/Downloads/ 指令應該會是:
hdiutil convert -format UDRW -o ~/Downloads/ubuntu-20.04-desktop-amd64.img ~/Downloads/ubuntu-20.04-desktop-amd64.iso
- hdiutil: convert: only a single input file can be specifiedhdiutil: convert: only a single input file can be specifiedUsage: hdiutil convert -format <format> -o <outfile> [options] <image>
- Note: OS X tends to put the .dmg ending on the output file automatically.
- Run diskutil list to get the current list of devices
- Insert your flash media
- Run
diskutil list
請找到你的 USB 在那一個 path
again and determine the device node assigned to your flash media (e.g. /dev/disk2)
- Run diskutil unmountDisk /dev/diskN 請 umount 到你的 USB 在那一個 path
(replace N with the disk number from the last command; in the previous example, N would be 2)- If you see the error “Unmount of diskN failed: at least one volume could not be unmounted”, start Disk Utility.app and unmount the volume (don’t eject).
- Execute
sudo dd if=/path/to/downloaded.img of=/dev/diskN bs=1m
如果你是下載到 ~/Downlaods/, 你的 usb 在 /dev/disk2 , 你的指令是
sudo dd if=./ubuntu-20.04-desktop-amd64.img.dmg of=/dev/disk2 bs=1m
(replace /path/to/downloaded.img with the path where the image file is located; for example, ./ubuntu.img or ./ubuntu.dmg).
- Run
diskutil eject /dev/diskN
搞定,可以拿去開機了。
and remove your flash media when the command completes
- Restart your Mac and press alt while the Mac is restarting to choose the USB-Stick
透過指令,會有一個問題, dd 指令完成的時候 Mac 會彈出這一個畫面:
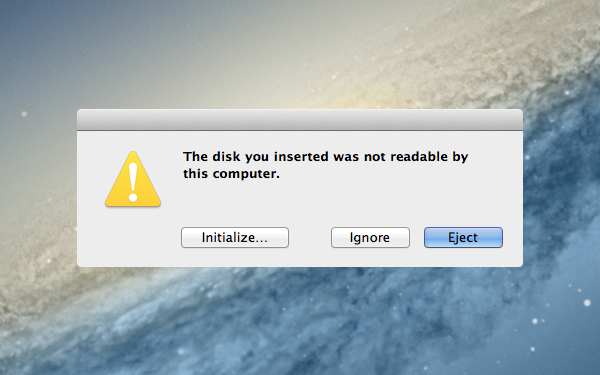
寫: The disk you inserted was not readable by this compute, 寫成中文就是,插入的USB裝置 Mac 無法存取。
我居然點了第1個按鈕”Initialize…”(初始化),就是去重切 USB 裡的Partition(分割表),再重做一次,還是一樣的錯誤訊息。我上網查了一下,原來,這是正確的!太怪了!直接點 Eject(退出USB),再把USB放到舊的PC上,結果真的可以開始安裝Ubuntu!
相關文章:
macOS 無法修改分區圖(partition map)
https://max-everyday.com/2020/03/couldnt-modify-partition-map-on-macos/