在Windows 平台雖然有內建的桌面錄影程式,但是只能針對部份或特定遊戲做錄製,無法錄檔案總管的操作畫面,推薦使用 Free Cam 來錄畫面.
- Free Cam 下載:
https://www.freescreenrecording.com/
附註: 下載時,可以亂填一個不存在的 email 信箱.
Free Cam 錄出來只能使用 wmv 格式, 如果是要分享給 mac 平台上使用, 會有點麻煩, 轉檔程式建議使用 QWinFF.
- QWinFF 下載:
https://sourceforge.net/projects/qwinff/
與 Free Cam 8 相比, PicPick 可以直接錄出 mp4, Free Cam 8 只能錄出 .wmv 格式, 如果影片要拿到 macOS 上去編修, 需要轉成 .mp4 格式, 感覺 PicPick 在這一點比 Free Cam 8 好用. 而且還可以錄成 .gif 檔.
- PicPick 檔案下載:
https://picpick.app/zh-tw/download/
附了 Free Cam8 / PicPick 在 Windows 上可免費錄影, 免付費的 PicPick 只能錄影2分鐘, Free Cam8 和 ShareX 就沒有長度限制, ShareX 有開放原始碼, 使用上應該滿安全的:
- ShareX 檔案下載:
https://github.com/ShareX/ShareX/releases
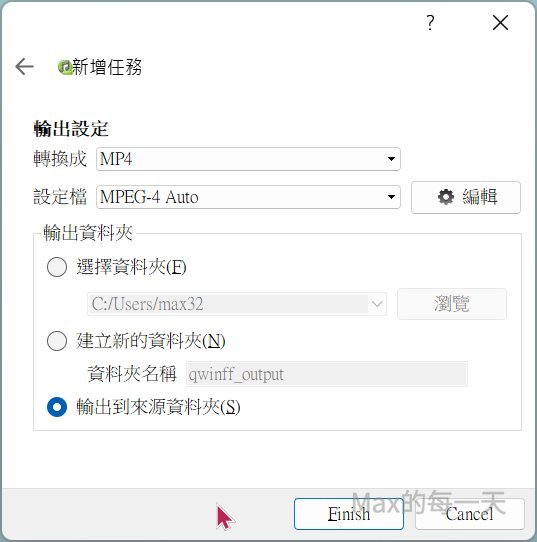
QWinFF 使用起來很簡單, 先按功能列裡的 + 號, 選擇要的影片檔案.
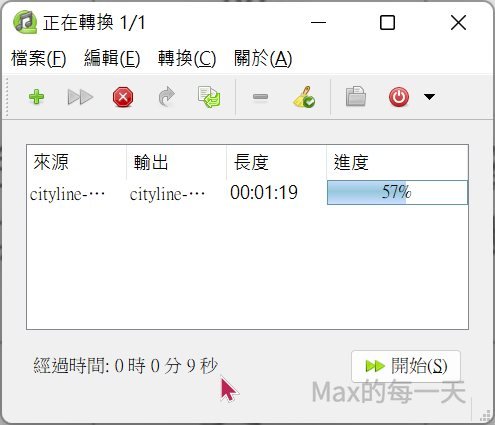
再選擇, 要輸出的格式, 還有要匯出到那一個資料夾, 按下 Finish 後就算完成一個任務的設定, 回到上面的主畫面, 按右下角的 “開始(S)” 按鈕, 就可以拿到轉換好的檔案, 輕鬆又快速.
用了一陣子 QWinFF, 覺得轉出來的影片畫質有點太差, 有可能是預設值在 23 frame/sec 的關係, 建議改用 ffmpeg, 先在官網下載:
http://ffmpeg.org/download.html#build-windows
再服用下列的批次檔 wmv2mp4.bat
ffmpeg -i %1 -c:v libx264 -crf 23 -profile:v high -r 30 -c:a aac -q:a 100 -ar 48000 %2
使用方式:
wmv2mp4.bat input.wmv outout.mp4
使用上面參數轉檔, 原本轉出的檔案大小, 會從 5.8MB 長大到 9.6MB, 畫質也會略好一點. 很產生的影片中的聲音, 雖然在大多數的軟體是可以被播放, 但在 iMovie 無聲…
觀查 ffmpeg 裡顯示的媒體資訊, 沒有給參數時 track info 長這樣:
Stream #0:0[0x1]:
無法播放聲音的影片, track info 長這樣:
Stream #0:0[0x1](und):
多一個 (und), 猜測在 iMovie 裡無聲的原因是 -q:a 100 造成:
Variable bit rate is usually achieved by setting -q:v (or -q:a for audio) instead of -b:v (or -b:a), which just sets a target bit rate.
解決了聲音後, 來研究怎麼讓畫質變好, ffmpeg 轉檔的預設值是編碼時間與畫質的折衷, 如果不考慮時間, 希望畫質較高,
ffmpeg 編碼參數:
Preset
A preset is a collection of options that will provide a certain encoding speed to compression ratio. A slower preset will provide better compression (compression is quality per filesize). This means that, for example, if you target a certain file size or constant bit rate, you will achieve better quality with a slower preset. Similarly, for constant quality encoding, you will simply save bitrate by choosing a slower preset.
Use the slowest preset that you have patience for. The available presets in descending order of speed are:
ultrafastsuperfastveryfastfasterfastmedium– default presetslowslowerveryslowplacebo– ignore this as it is not useful (see FAQ)
You can see a list of current presets with -preset help (see example below). If you have the x264 binary installed, you can also see the exact settings these presets apply by running x264 --fullhelp.
Tune
You can optionally use -tune to change settings based upon the specifics of your input. Current tunings include:
film– use for high quality movie content; lowers deblockinganimation– good for cartoons; uses higher deblocking and more reference framesgrain– preserves the grain structure in old, grainy film materialstillimage– good for slideshow-like contentfastdecode– allows faster decoding by disabling certain filterszerolatency– good for fast encoding and low-latency streamingpsnr– ignore this as it is only used for codec developmentssim– ignore this as it is only used for codec development
For example, if your input is animation then use the animation tuning, or if you want to preserve grain in a film then use the grain tuning. If you are unsure of what to use or your input does not match any of tunings then omit the -tune option. You can see a list of current tunings with -tune help, and what settings they apply with x264 --fullhelp.
Profile
The -profile:v option limits the output to a specific H.264 profile. You usually do not need to use this option and the recommendation is to omit setting the profile which will allow x264 to automatically select the appropriate profile.
Some devices (mostly very old or obsolete) only support the more limited Constrained Baseline or Main profiles. You can set these profiles with -profile:v baseline or -profile:v main. Most modern devices support the more advanced High profile.
Another reason to use this option is to match other video profiles if you want to concatenate them with the concat demuxer.
Note that usage of -profile:v is incompatible with lossless encoding and setting -profile:v high444 does not work.
List of profiles that x264 supports.
baselinemainhighhigh10(first 10 bit compatible profile)high422(supports yuv420p, yuv422p, yuv420p10le and yuv422p10le)high444(supports as above as well as yuv444p and yuv444p10le)
最後, 發現沒有聲音的 mp4 直接再用 ffmpeg 不下參數轉成 .mp4 或 .mov 都變回來 5MB 的大小, 猜測應該是 VBR 的設定值造成檔案在某些情況下 bitrate 較高, 在直接使用下面的參數, 並指定輸出的副檔名為 .mp4 或 .mov 就可以正常在 iMovie 裡使用:
ffmpeg -i %1 -c:v libx264 -preset slow -crf 22 -c:a copy %2
使用上面這段, 還是會有問題, 原本的 wmv 的音軌資訊:
Stream #0:1: Audio: wmav2 (a[1][0][0] / 0x0161), 48000 Hz, stereo, fltp, 128 kb/s
使用上面這段後, 會造成無聲音:
Stream #0:1[0x2]: Audio: none (a[1][0][0] / 0x0161), 48000 Hz, stereo, 127 kb/s (default)
由於原本的音軌編碼是 wmav2 也要重新換成 aac, 所以新的轉檔用參數如下:
ffmpeg -i %1 -c:v libx264 -preset slow -crf 22 -c:a aac %2
資料來源
How to convert WMV to MP4?
https://superuser.com/questions/73529/how-to-convert-wmv-to-mp4
H.264 Video Encoding Guide
https://trac.ffmpeg.org/wiki/Encode/H.264
ffmpeg 居然也支援 GPU 耶! 真酷.
https://docs.nvidia.com/video-technologies/video-codec-sdk/ffmpeg-with-nvidia-gpu/
如果你要在 Windows 11 上設定環境變數給 ffmpeg, 請參考:
Windows 11 設定環境變數
https://max-everyday.com/2023/01/windows-11-environment-variables/